


Document Actions
gvSIG-Desktop 1.10. User Manual
In this latest version of the jCRS extension, users can define a custom CRS. This functionality is available through the CRS selection dialog, see figure 14.
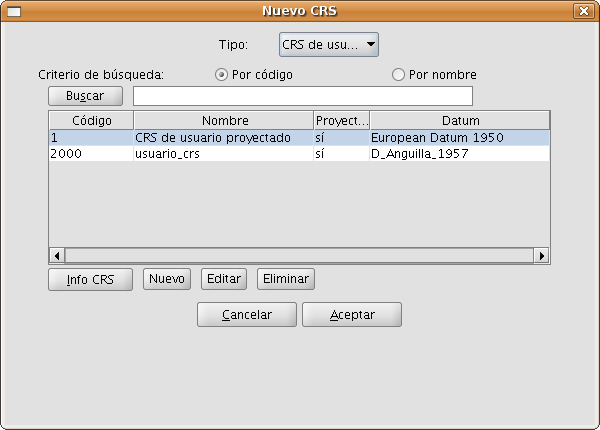
Figure 14: Selection of a user-defined CRS
When selecting User CRS as the type of CRS, you can choose from the following options:
- Choose a custom CRS that was previously defined, by selecting it from the table and click on OK. To facilitate the selection when there are many user-defined CRS, there are two search options to find common CRS: by code and by name.
- To find information on the selected CRS, you can click on the CRS info button, after which a window with the available information will appear.
- To edit the selected CRS, click on the Edit button. A dialog with different tabs will appear which is similar to the dialog in which you can define a new custom CRS. These dialogs will be described later on in this document.
- To delete the selected CRS, click on the Remove button.
- Create a new custom CRS, as described here below.
To create a new custom CRS, click on the New button in the dialog shown in Figure 14, after which the dialog User defined CRS will open (see figure 15) to guide you through the process of creating a custom CRS.
This dialog includes three tabs:
- User CRS, where you can choose between three alternatives to create the CRS:
- From user definitions. With this option, the user will enter all the needed information to create the CRS. When this option is selected, the panels in the Datum and Coordinate system tabs will appear empty so that the user can fill them, although some information (ellipsoid, prime meridian, …) can be taken from other CRS that are included in EPSG.
- From an existing CRS. This option permits the selection of an existing CRS from EPSG, by clicking on the button with three points, load the information in the corresponding panels under the Datum and Coordinate system tabs, and create the custom CRS by modifying this information.
- From a WKT string. This option is similar to the previous one, but here the WKT string is used to load the information of an existing CRS in the corresponding panels of the Datum and Coordinate system tabs.
- Datum, where you can enter the Datum information associated with the CRS.
- Coordinate system, where the information of the coordinate system associated with the CRS is filled.
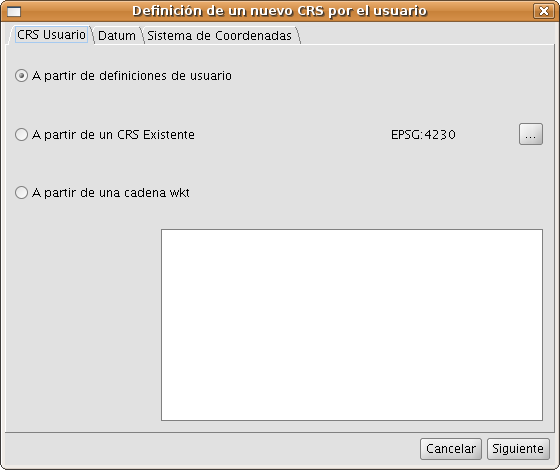
Figure 15: Create a new custom CRS
By clicking the button Next you can move from one tab to the next.
In figure 16, the panel of the Datum tab is shown. In this tab, the following information must be filled:
- Information about the CRS to be defined that will be used in search queries:
- Name. Alphanumeric string to indicate the name of the CRS.
- Code. Integer number to be assigned to the CRS for indexing in the database, this must be a unique number that has not been previously assigned to another custom CRS.
- Information about the datum associated with the CRS:
- Name of the datum. Alphanumeric string to indicate the name of the datum. This can be selected from an existing EPSG CRS by clicking on the button with three points on the right of the text box.
- Ellipsoid. Information on the reference surface of the CRS to be defined. This can be selected from an existing EPSG CRS by clicking on the button with three points on the right of the text box for the ellipsoid name. The information to be filled is:
- Name of the Ellipsoid. Alphanumeric string to indicate the name of the ellipsoid.
- Shape and dimensions of the ellipsoid. You can choose between two options:
- a, inv_f, which refers to the semi-major axis and inverse flattening. To define the semi-major axis correctly it is necessary to enter the value and corresponding unit.
- a, b, which refers to the semi-major and semi-minor axis of the ellipsoid. This option should be chosen when the reference surface is a sphere, in which case the values of both semi-axes are equal and the resulting value of the inverse flattening is infinite. To define correctly both semi-axes of the ellipsoid, the value and corresponding unit must be entered.
- Meridian. Here, the name of the prime meridian that is used for the datum must be filled. You can select the prime meridian from an existing EPSG CRS by clicking on the button with three points on the right of the textbox for the meridian name. The following information must be filled:
- Name of the meridian. Alphanumeric string to indicate the prime meridian.
- Longitude. Geographic longitude relative to Greenwich. The value and corresponding unit must be filled.
The default ellipsoid and meridian for user defined CRS are the GRS80 ellipsoid and Greenwich meridian.

Figure 16: Definition of the datum for the CRS
When the datum parameters are defined, the Coordinate system information associated with the CRS must be filled in the next tab as shown in figure 17.
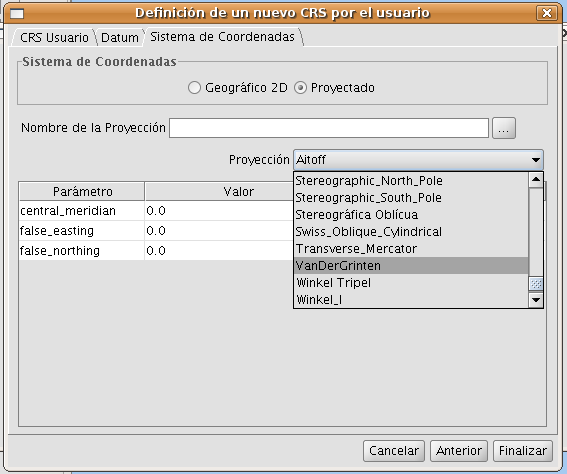
Figure 17: Selection of the coordinate system for the CRS
The following Coordinate system information must be filled:
- Coordinate system: Geographic 2D or Projected.
- In case of a projected coordinate system, the following must be filled:
- Name of the projection. Alphanumeric string to indicate the name of the projection.
- Projection. One of the available options of the drop-down list must be chosen.
- Projection parameters: Value and unit. The list of parameters will change according to the type of cartographic projection.
To edit a custom CRS that was previously defined (see figure 14), select this CRS from the table and click on Edit.
Below in figure 18 the dialog Definition of a new custom CRS is displayed, where the tab User CRS is disabled as well as the CRS code in the Datum tab. The reason why you can not modify the CRS code is that this code is used for the indexation of the user database. The other values for the datum are editable, as well as the values for the Coordinate system tab (see figure 19).

Figure 18: Editing of the datum values
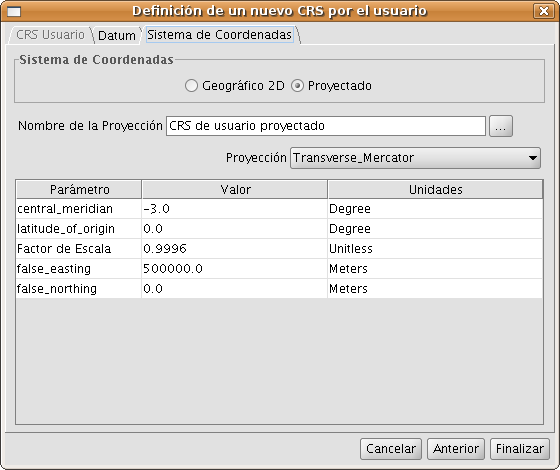
Figure 19: Editing of the coordinate system of the CRS
Cached time 11/21/13 07:06:17 


